


An Unauthorized Guide to SwiftData Migrations


Beginning with iOS 17, Apple introduced SwiftData, a first party solution for persisting data an alternative to Core Data. SwiftData integrates nicely and seamlessly into your SwiftUI applications, and allows developers to add persistence to their apps with minimal code changes.
I recently built an iOS app to help manage play time during soccer matches, and for the remainder of this article, all code examples will come directly from that app.
@Model
Creating a new SwiftData model object is as simple as using a special @Model macro:
@Model
final class Team {
  ...
  @Relationship(deleteRule: .cascade, inverse: \Player.team)
  var players: [Player] = []
}

@Model
final class Player {
  ...
  var team: Team?
}

@Model
final class PlayerCoordinate {
  ...
  @Relationship
  var player: Player?
}
@Relationship
The @Relationship macro is used when you have models that are related to each other. In this example, a Player belongs to a single Team, and a Team can have many players. A PlayerCoordinate also belongs to a single Player. If you have worked with relational databases, this should seem pretty familiar, and you can think of a @Relationship as a one-to-one or a many-to-many relationship with foreign keys. In Core Data, relationships are configured while setting up the entities of your database in your .xcdatamodeld file. Core Data requires you to be explicit about inverse relationships, and also allows you to choose one-to-one or one-to-many options. I’ve also specified a deleteRule: .cascade, which means if a Team is deleted, all associated Players will be deleted as well. For fans of RDBMSes, this should feel comfortable and make sense.
Foreshadowing a little bit here, Player does NOT has an inverse relationship to PlayerCoordinate…which means that if a Player is deleted, the related coordinate still has a reference to a Player which no longer exists 💀.
ModelContainer
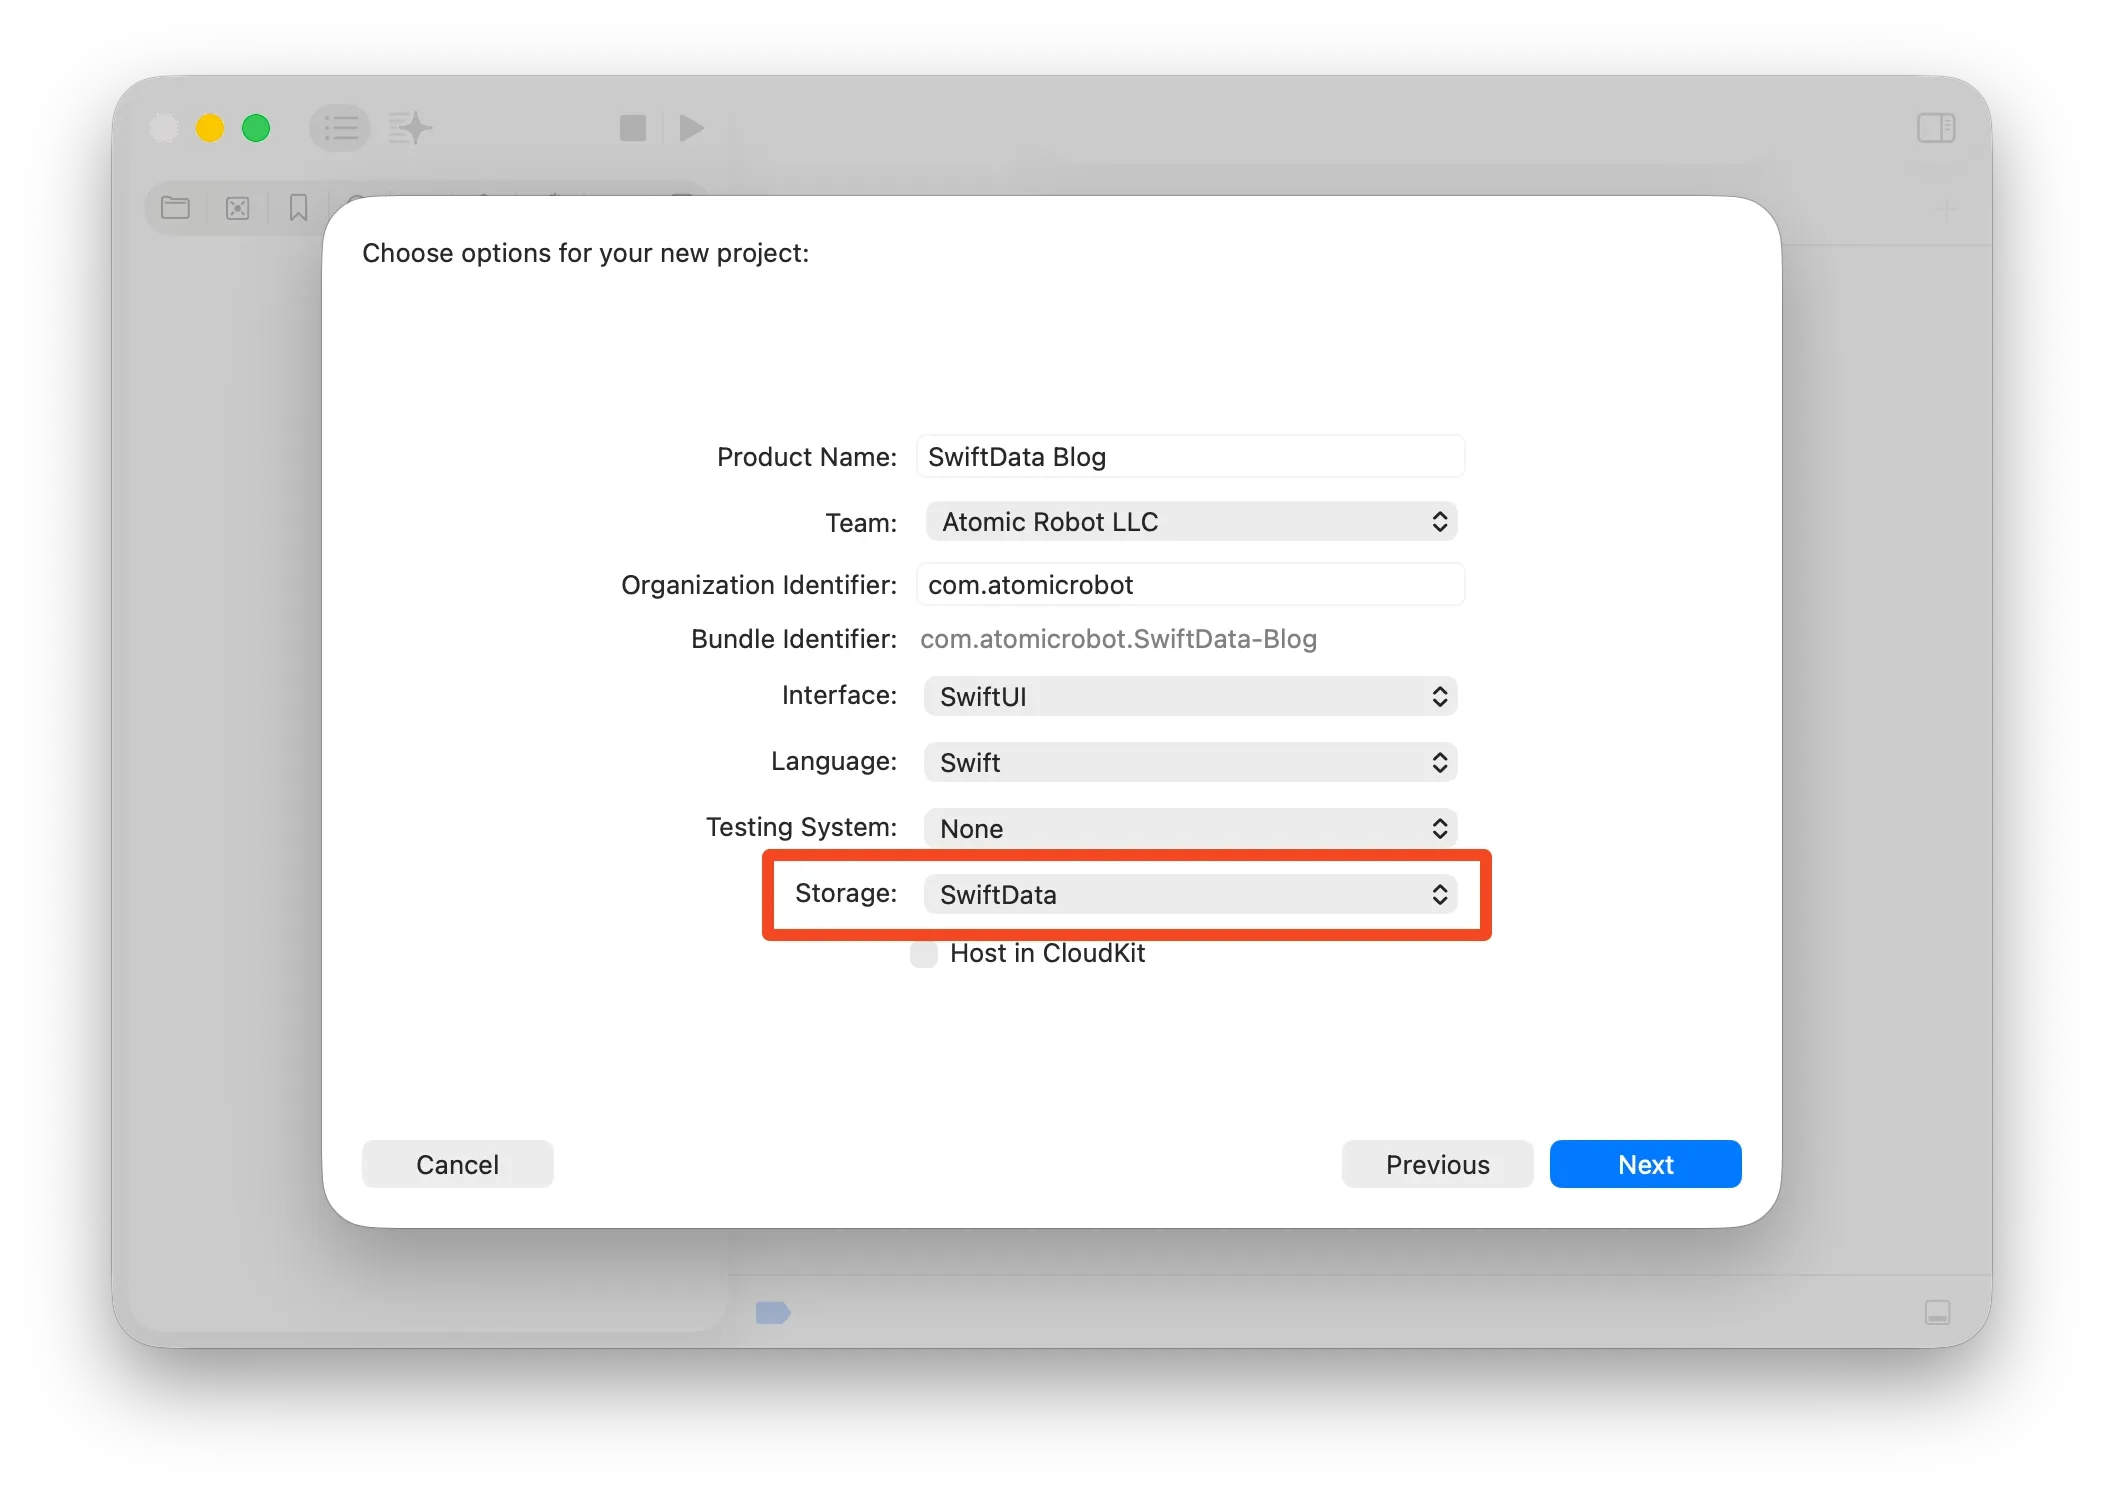
The final step for adding persistence to your app is to create a ModelContainer, which can be thought of as the physical database. If you create a new project using Xcode and include SwiftData for “Storage,” this initial creation step is handled for you and the ModelContainer is injected into your @Environment, which makes your data accessible throughout the app.
And some code, so you can see how the ModelContainer is being created and injected into the environment.
struct SwiftData_BlogApp: App {
  var sharedModelContainer: ModelContainer = {
    let schema = Schema([
      Item.self,
    ])
    let modelConfiguration = ModelConfiguration(
      schema: schema,
      isStoredInMemoryOnly: false
    )

    do {
      return try ModelContainer(
        for: schema,
        configurations: [modelConfiguration]
      )
    } catch {
      fatalError("Could not create ModelContainer: \(error)")
    }
  }()

  var body: some Scene {
    WindowGroup {
      ContentView()
    }
    .modelContainer(sharedModelContainer)
  }
}
This example code works great, and now you’re ready to start saving data in your app! There are plenty of examples around that show you how to use @Query to fetch data, and a ModelContext to perform CRUD operations, so I won’t repeat them here. At this point I thought everything was fine and dandy, until my soccer team ended their season and I needed to update my roster. So like any good team manager, I started deleting old Players and adding their replacements. I was poking around the app, looking at historic game data when my app started crashing. Crashes are bad. Why was it crashing?
App Crashes
As I started debugging and testing, I realized that I had references/relationships to deleted Player objects all over the app for things like scoring, substitutions, game day rosters, and positions on the field. My relationships weren’t set up correctly in PlayerCoordinate (and a couple other models I’m omitting here), and I had stale data that the app was trying to access. With SwiftData models, accessing properties on a deleted will cause crashes/exceptions at runtime (this is bad). Unfortunately, Swift and SwiftData don’t really provide me any “safe” workarounds once the data is in a bad state, which means I needed to find and develop a fix.
Fixing databases might not be easy, but it is possible. In the land of RDBMS, you simply create a new version of your database schema, then write a migration to convert the data from the old version to the new. That’s not so bad…how can I do that in SwiftData?
Turns out, documentation on database migrations using SwiftData is severely lacking, AND, every SwiftData example I’ve ever seen neglects to talk about schema versioning. You simply define a Schema with @Models and magically you can save data! Which is super great and awesome and it demos really well, but as it turns out, really leaves a gap in your long term usage of developing with SwiftData. Let’s take a look at how we can fix it.
VersionedSchema
First things first, whenever you are using SwiftData you should ALWAYS start with a VersionedSchema. Not once did I ever see that piece of advice in all the research I did around SwiftData (and you’re here getting that tip for free!). VersionedSchema is a protocol, which means your new schema needs to conform. I implemented something like this:
enum SchemaV1: VersionedSchema {
  static var models: [any PersistentModel.Type] {
    [
      SchemaV1.Game.self,
      SchemaV1.Player.self,
      SchemaV1.PlayerCoordinate.self
    ]
  }

  static var versionIdentifier = Schema.Version(1, 0, 0)
}

extension SchemaV1 {
  @Model
  final class Game {
    ...
  }

  @Model
  final class Player {
    ...
  }

  @Model
  final class PlayerCoordinate {
    ...
  }
}
And now when you create your ModelContainer for the app, you use the versioned schema instead:
let schema = Schema(versionedSchema: SchemaV1.self)So that’s easy, and now we have actual versioned database to start with if and when we need a complex data migration. I chose to scope my models to the specific schema version so I didn’t have to name models with a version like PlayerV1. Instead I created typealiases (which you can see below).
But my Schema Isn’t Versioned
What’s that? You, like me, didn’t start with a VersionedSchema? Now what? How can we upgrade an unversioned database? At this point I spent A LOT of time researching (ie, Googling) and trying to figure out how to address this situation. The Apple documentation for SwiftData is actually pretty decent, but don’t call out this situation of migrating from an unversioned version (or at least they didn’t when I was problem solving), so from this point forward I can only show you what worked for me. I have no idea if this will work for your use case, but you can try. Here’s a DatabaseManager object I built:
import SwiftData

// typealiases to point to the latest version of our schema
typealias SchemaCurrent = SchemaV1

typealias Game = SchemaCurrent.Game
typealias Player = SchemaCurrent.Player
typealias PlayerCoordinate = SchemaCurrent.PlayerCoordinate

// MARK: - DatabaseManager

@MainActor
struct DatabaseManager {
  /// Creates a `ModelContainer` to use for data storage. We first need to
  /// get our un-versioned schema (no version #) to a `VersionedSchema` (V0).
  /// From there we have custom migration to V1.
  /// - Returns: `ModelContainer`
  static func setupModelContainer() throws -> ModelContainer {
    // First let's just see if we can load our `ModelContainer` using the
    // latest schema and migration plan.
    do {
      return try createCurrentModelContainer()
    } catch SwiftDataError.loadIssueModelContainer {
      // Okay, we couldn't migrate, likely due to "Cannot use staged
      // migration with an unknown model version." First we need to load
      // our un-versioned schema, then save it as versioned...
      let legacySchema = Schema(versionedSchema: SchemaV0.self)
      let legacyModelConfiguration = ModelConfiguration(
        schema: legacySchema,
        isStoredInMemoryOnly: false
      )
      let legacyContainer = try ModelContainer(
        for: legacySchema,
        configurations: [legacyModelConfiguration]
      )

      // Cool, now let's save...
      try legacyContainer.mainContext.save()

      // ...and finally let's try again to load/migrate our current version
      return try createCurrentModelContainer()
    } catch {
      throw error
    }
  }

  /// Creates a `ModalContainer` based on the most recent schema version
  /// and migration plans.
  /// - Returns: New `ModalContainer` for saving all the data.
  static func createCurrentModelContainer() throws -> ModelContainer {
    let schema = Schema(versionedSchema: SchemaCurrent.self)
    let modelConfiguration = ModelConfiguration(
      schema: schema,
      isStoredInMemoryOnly: false
    )

    let container = try ModelContainer(
      for: schema,
      migrationPlan: MigrationPlan.self,
      configurations: [modelConfiguration]
    )

    return container
  }
}
Just guessing here, but since my unversioned schema (from initial app launch) matched exactly the V1 schema, the lightweight migration happened on its own…but, the end result is that we now have a VersionedSchema that we can use moving forward.
SchemaMigrationPlan
You may have noticed the MigrationPlan when setting up the ModelContainer, and we’ll talk about that next. SwiftData and Core Data both have the concept of a “lightweight migration,” which basically means if the OS is able to figure out how you changed the data models, and it can figure out how to upgrade the old database to the new database, this all happens magically in the background. Lightweight migrations can happen when you add new models, or maybe add new properties to existing models (that include default values). Doing something like converting an old model to a new type and mapping that data requires a more complicated plan. If you try to run your app after making significant changes to your schema, you’ll end up with a runtime issue creating the ModelContainer. In the case of complex data migrations, we need to have a SchemaMigrationPlan.
The docs explain that a SchemaMigrationPlan is:
- An interface for describing the evolution of a schema and how to migrate between specific versions.
And that’s pretty much where the docs end, and experimentation begins. Below is some code that I used to migrate between my different schema versions:
import Foundation
import SwiftData

enum MigrationPlan: SchemaMigrationPlan {
  static var schemas: [any VersionedSchema.Type] {
    [
      SchemaV0.self,
      SchemaV1.self,
    ]
  }

  static var stages: [MigrationStage] {
    [
      migrateV0toV1,
    ]
  }

  // MARK: Migration Stages

  static let migrateV0toV1 = MigrationStage.custom(
    fromVersion: SchemaV0.self,
    toVersion: SchemaV1.self,
    willMigrate: { context in
      // Clean up old code where a `Player` has been deleted, but the
      // cascading was not set up properly.
      let coordinates = try context.fetch(FetchDescriptor<SchemaV0.PlayerCoordinate>())
      for coordinate in coordinates {
        guard let player = coordinate.player else { continue }
        if !Self.isModelStillValid(player, in: context) {
          coordinate.player = nil
        }
      }

      try context.save()

      return
    },
    didMigrate: { context in
      let teams = try context.fetch(FetchDescriptor<SchemaV1.Team>())
      for team in teams {
        for player in team.players {
          let teamMember = mapPlayerToTeamMember(player)
          teamMember.team = team
        }
      }
      try context.save()
    }
  )

  /// Maps a `Player` object to a `TeamMember`
  /// - Parameter player: The `Player` we need to convert.
  /// - Returns: A new `SchemaV1.TeamMember`
  private static func mapPlayerToTeamMember(
    _ player: SchemaV1.Player
  ) -> SchemaV1.TeamMember {
    SchemaV1.TeamMember(
      createdOn: player.createdOn,
      firstName: player.firstName,
      lastName: player.lastName,
      number: player.number
    )
  }

  /// Checks that a given model object is still "valid" in the database.
  /// - Parameters:
  ///   - player: The `Player` object we are referencing.
  ///   - context: The `ModelContext` we are working with.
  /// - Returns: Whether or not the model is still good in the DB.
  private static func isModelStillValid(
    _ player: SchemaV0.Player,
    in context: ModelContext
  ) -> Bool {
    do {
      let persistentModelID = player.persistentModelID
      let descriptor = FetchDescriptor<SchemaV0.Player>(
          predicate: #Predicate { $0.persistentModelID == persistentModelID }
      )
      return try context.fetch(descriptor).first != nil
    } catch {
      return false
    }
  }
}
My app crash was occurring when I tried to access the player property on a PlayerCoordinate. Unfortunately, this throws an exception at runtime that can’t be handled in a do...catch or anything else, which makes it difficult to handle during app execution. After more research, I realized that I could check the validity of a model by trying to fetch it from the database by its persistentModelID. If the fetch returns nil, we can assume that model no longer exists. In my data migration, I took that opportunity to update the property on my PlayerCoordinate, and in other places I deleted models that have invalid Player references (the migration code above does not show this demonstration).
MigrationStage
A MigrationStage specifies the fromVersion and toVersion of your schemas, and also gives you a chance to manipulate the data before the migration begins in a willMigrate closure. This is where I tried to cleanup/fix the invalid data references in V0 before it was converted to V1. In the didMigrate closure, this is where I created new objects V1 schema and mapped them from the old objects (in this example, Player objects were converted to TeamMember objects).
Conclusion
So there you have it, a broken database good as new. Let’s review:
- ALWAYS use
VersionedSchemawhen using SwiftData for data persistence - Get your relationships in order using
@Relationship - Use a
SchemaMigrationPlanfor handling complex data migrations
Photo by benjamin lehman on Unsplash